In recent posts, I wrote about data stores, specifically, about choosing the right one for the right problem domain. I also wrote about modelling data in graphs, with Neo4j. I the last post, on modelling graphs, I promised to discuss how we can get good performance in Neo4j. I will be addressing that in this post, by presenting 12 steps you can follow to attain high performance when using Neo4j, especially in a large data volume setting.
First thing is first. Let’s clarify the terminology. I use the term ’large data’ loosely here. When I say ’large data’, I am not referring to Big Data, which is a loosely defined term itself. What I do mean by large data, is having at least a million nodes in a graph, with millions of connections. Since graphs operate in a different way than SQL stores, it’s important for us to know how to insert data, query and run computations with them in the most robust manner. For instance, Neo4j is an in-memory operating graph, so paths and sub-graphs that are queried frequently are retrieved much faster in their consecutive runs, compared to the first. Now, let’s go over the steps you can take to make your graph performant. Note that they are not in any particular order.
Step 1: Design a Smart Model
I covered this one in my post on Modelling Graphs with Neo4j. So if you haven’t read that one yet, go right ahead. The basic idea is that you need to choose the set of nodes and relationships that will allow you to coherently express your real-world model, and make queries that can answer the questions you need answered in the most efficient way possible.
Step 2: Index Queried Properties
If you know you will be running queries that will need to check for user’s name, or address, then you should index these properties in the node they exist. Neo4j uses Apache Lucene, a search engine that supports full-text search. You can even use Regular Expressions for your Match queries, in Neo4j. But this only applies to the properties that you have indexed. Here is an example of creating an index for a property address for all User type nodes in Neo4j:
CREATE INDEX ON :User(address)
We just specify the label, and the name of the property we want to index against. Note that running match queries, or searching for addresses that fit a certain regular expression pattern on a non-indexed property will force Neo4j to run a full graph search, on all nodes that have that property. This can drastically kill your performance.
Step 3: Don’t Run Full Graph Searches
The underlying engine of Neo4j keeps data stored as nodes, and relationships, and runs some of its operations in-memory, after their first execution. The advantage to this is that traversing paths among nodes can be significantly faster. But, it also has a downside, in that in does not handle full graph queries well. The database simply wasn’t designed for queries that touch on its entire graph space; ideally, a query should only affect a certain region of our graph, i.e. a sub-graph, making changes that affect only a few nodes, or retrieving data from a set of neighbours. This doesn’t mean that can’t insert or read 10,000 nodes at a time. But 100,000 might be just too much.
Step 4: Use Labels to Narrow Search Scopes
This one is related to the previous step. In Neo4j, we can use labels to distinguish our entity types. However, labels also serve a another very important purpose: reducing our search scope. Imagine that we have a book store domain model, and we use a property named ’type’ to distinguish say, users from books in our domain. With this property indexed, retrieving users by filtering nodes with the value “User” for the ’type’ property may work well enough for us. But if we use labels, we can reduce the number of nodes Neo4j will have to scan to find our desired node. A label, with the index on an ‘ID’ property, would likely be more efficient than using two indexes: one the ’type’ property, and another on the ‘ID’. This can even be of greater use if we have domain with multiple labels. For example, if we label each book in our domain with its genres, e.g. by applying the labels Horror, Thriller to the “Tale of Dracula”, we can reduce our search scope of queries looking for those particular genres by a great factor.
Step 5: Define Relationship Types and Direction in Path Traversal Queries
When we run a query to find two or more labeled connected nodes, we can actually omit the relationship type from our cypher statement:
MATCH (n :`User` {id:"1"})-[r]-(b :User {id: "2"})
RETURN b
This, however, makes the graph find all types of connections that may exist between the two nodes we specified. We can help our case by specifying two things: the type of relationships we’re interested in, as well as the direction of that relationship.
MATCH (n :`User` {id:"1"})-[r :READ]->(b :User {id: "2"})
RETURN b
Now, if the entity User has other types of relationships with other entities or even with other User entities, they will be ignored by the traversal algorithm, making it faster.
Step 6: Prevent Data Duplication Efficiently
One of the key concerns in a data store management is the prevention of duplication of data. A Primary Key alone can’t stop you from inserting an entity twice into your database; especially if your data entities don’t come with an ID, or a way to uniquely identify them. What we generally do is define constraints on certain properties of our entities, to distinguish them. For example, for a user, we can compare their email, and for a Book its ISBN code. Both of these values can uniquely identify these entities, and prevent their duplication in a database. This is important because duplicate data can have adverse effects on our applications, like recording sales on two registered Books that are actually the same, and increase our data volume with useless data.
In Neo4j, there are ways for us to maintain uniqueness of data. One of them is the Unique Constraint. Like indexes, a unique constraint is applied to a specific property of nodes with a defined label. On each query we perform to insert a node with the label, the database will check and see if the constraint is being violated or not. If not, the new entity is added; otherwise, the database cries foul. While this method works, I would recommend the use of MERGE instead. Using MERGE, we can query the graph for a node based on a single property on insert, and have the database create it if it does not exist, and match it otherwise. We would not have to define a constraint on our label and property of interest, thus preventing the graph from having to check the constraint. This can be beneficial on batch inserts. Example of an insert operation with MERGE:
MERGE (u :`User` {id: "1"})
SET u.address = "New Address"
When using MERGE, we have to be careful with the properties we apply to it, and paths as well. There is an article by Luanne Misquitta titled Cypher MERGE Explained, that describes how MERGE works in detail. I highly recommend reading it for the uninitiated and seasoned alike.
Step 7: Use the Transactional Endpoint
Neo4j has SDKs in several languages. Fundamentally, they all make use of the database’s REST based API, except when you’re running the embedded version of Neo4j with the Java SDK. This API provides endpoints for us to query nodes, relationships, indexes, and other schema related information. We can read, insert, update, and delete data from these endpoints. There is though another endpoint designed specifically for Cypher queries. The Cypher HTTP Transactional endpoint, as it is called, was designed to run cypher queries only. Once we connect to it, the server leaves the connection open to accept multiple queries in batches. We can run queries to insert hundreds of nodes and relationships, or read, delete, and update them. When we’re done, we can commit our transaction, persisting all of the changes we made; and if something goes wrong, we can also rollback our transaction, leaving the database as it was before we began. I have found that using the transactional endpoint for running batch operations to be the most efficient, and safe approach. We can quickly insert, read, and run queries to process data in bulk, all in a timely manner, with indexed nodes of course. Because the server keeps a connection opened, you will find that using the transactional endpoint to run batch operations can work better than sending thousands of queries to the database for each entity operation. And even if you’re not processing bulks of data, the option to rollback on any failed transaction makes this endpoint a great choice for transactional operations.
Step 8: Use Queries with Parameters
So far in my examples, I have explicitly written property values in my Cypher queries. I did this to make illustration easier. When running queries on Neo4j though, we should always make use of parameters, instead of creating raw statements. What this means is that, for our previous query, we’d actually send something like this:
MERGE (u :`User` {id: {userId}})
SET u.address = {userAddress}
Where userId, and userAddress would be sent as parameters, along with the Cypher query statement. If you have used Neo4j’s API, you know that those values would be sent as a JSON object. Most SDKs take care of these details for us, so you don’t have to worry about them. For example, in Python, when using either Neo4jRestClient or Py2Neo, we would send a plain dictionary with our values.
The reason why we should do this is because the Cypher parser is capable of caching execution paths. When we run the same query multiple types, changing only the values we’re comparing against, the Cypher parser ‘remembers’ how execute the query after the first time. So, if we’re using a query with parameters, and we change the values and run the query a second time, the engine will be able to find the nodes of interest more quickly. Conversely, if we use a raw query, the engine will have to construct the traversal path each time we run the query, thus reducing its performance.
Step 9: Profile Your Queries
When we run a Cypher query in Neo4j, there is a part of the system that is responsible for determining how to execute that query. Starting in Neo4j 2.2.x, there are two new features in Cypher, called EXPLAIN and PROFILE, that allow us to ask the database to tell us what the is the execution plan for a certain query is, and to profile it, respectively. When used, the database will give us an explanation of how the query would be executed, e.g. labels searched, number of estimated nodes that would be traversed, and final result, instead of executing the query.
As an example, let’s profile the following query:
PROFILE
MATCH (u :`User`)-[r :READ *0..2]->(b :`Book`)
RETURN b
LIMIT 10
The output we get from the Neo4j web console…
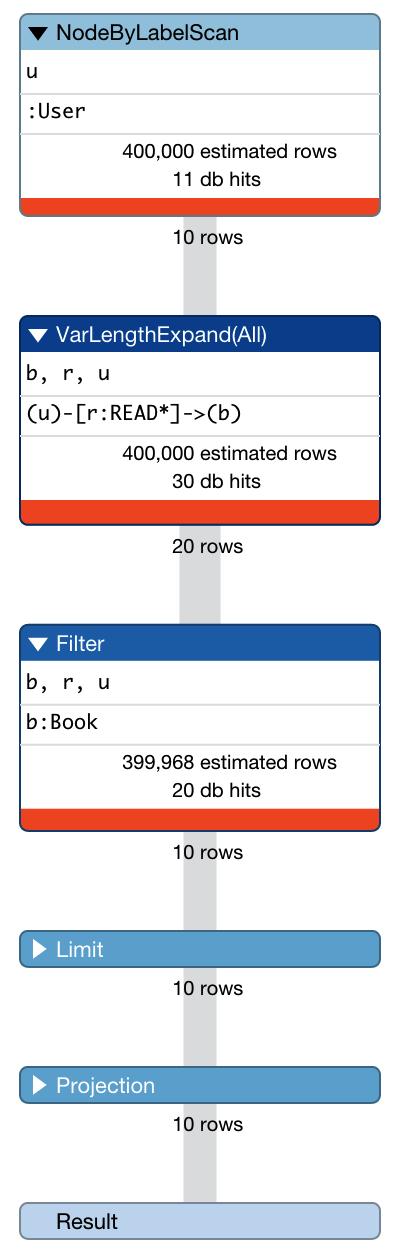
The profile shows us the estimate or projected number of values matched at each stage of the query: users, books read by users with the specified path distance, and our matched users. The variable db hits is a generic measure of the number of operations the db will performance to run the query. This is a practical tool for tuning our queries, because we can gauge the cost of the query, and the amount of data the algorithm will search through. By knowing how Cypher is actually executing our queries, wen can devise and test different queries until we find the most efficient way possible to get the information we want.
Step 10: Check the File Limit Set for Neo4j
In Linux/Unix systems, each user process has limit on the number of files it can open at one time. I am referring to the ulimit -n variable, for those of you that are familiar with it. This value is very important for neo4j, as explained in the Linux Performance Guide section of their documentation.
If you want to have this limit adjusted each time Neo4j starts, you can modify the neo4j start script, or just set it to your environment before starting neo4j. The value you’d want to set to depends on how you plan on using the database. Truthfully, there isn’t clear guideline on what to set the value to. You can start with the recommended value of 40000, and take it from there. Test and measure.
Step 11: Adjust Your Memory Configuration If Needed
If your the database isn’t responding well enough for you, you can always adjust its memory allocation configuration for the database, and JVM process. For example, you can define how much memory should be mapped for properties and relationships, as well as your standard JVM memory configuration. You can refer to their Performance Guide webpage for explanation on how to achieve this.
Step 12: Be Conservative With Concurrency
Neo4j provides a High Availability cluster that lets you setup up replicas to scale data reads. Unfortunately, this option is only available through in the Enterprise Edition for a fee. Now, with a data exchange mechanism based on REST, it’s not hard to imagine highly concurrent operations, accessing disperse parts of the graph turning our server sluggish, and at times non-responsive. We need to work around this limitation by being conservative with the number of concurrent requests we make. For example, while we’re inserting or retrieving a large amounts of data, e.g. 100000 nodes, instead of doing it one at a time, we can actually send 50 to 100 queries at a time, effectively reducing our number of connections by a factor of 50 to 100, with the transactional endpoint. Neo4j will execute all of them, and return the result for each in set. Now, while this number may seem big, it shouldn’t be a problem if we’re operating with labeled nodes with indexed properties, and making use of parameters on queries. Also, while running bulk write transactions, we should avoid reading data at the same time. And always, always, keep your queries narrowed to parts of the graph only.
By following these steps, should be able to have a performant graph database, helping you uncover connections between millions of nodes without breaking your server’s back.